No Knead Bread Recipe
This post may contain affiliate links. Please see my disclosure policy for more information.

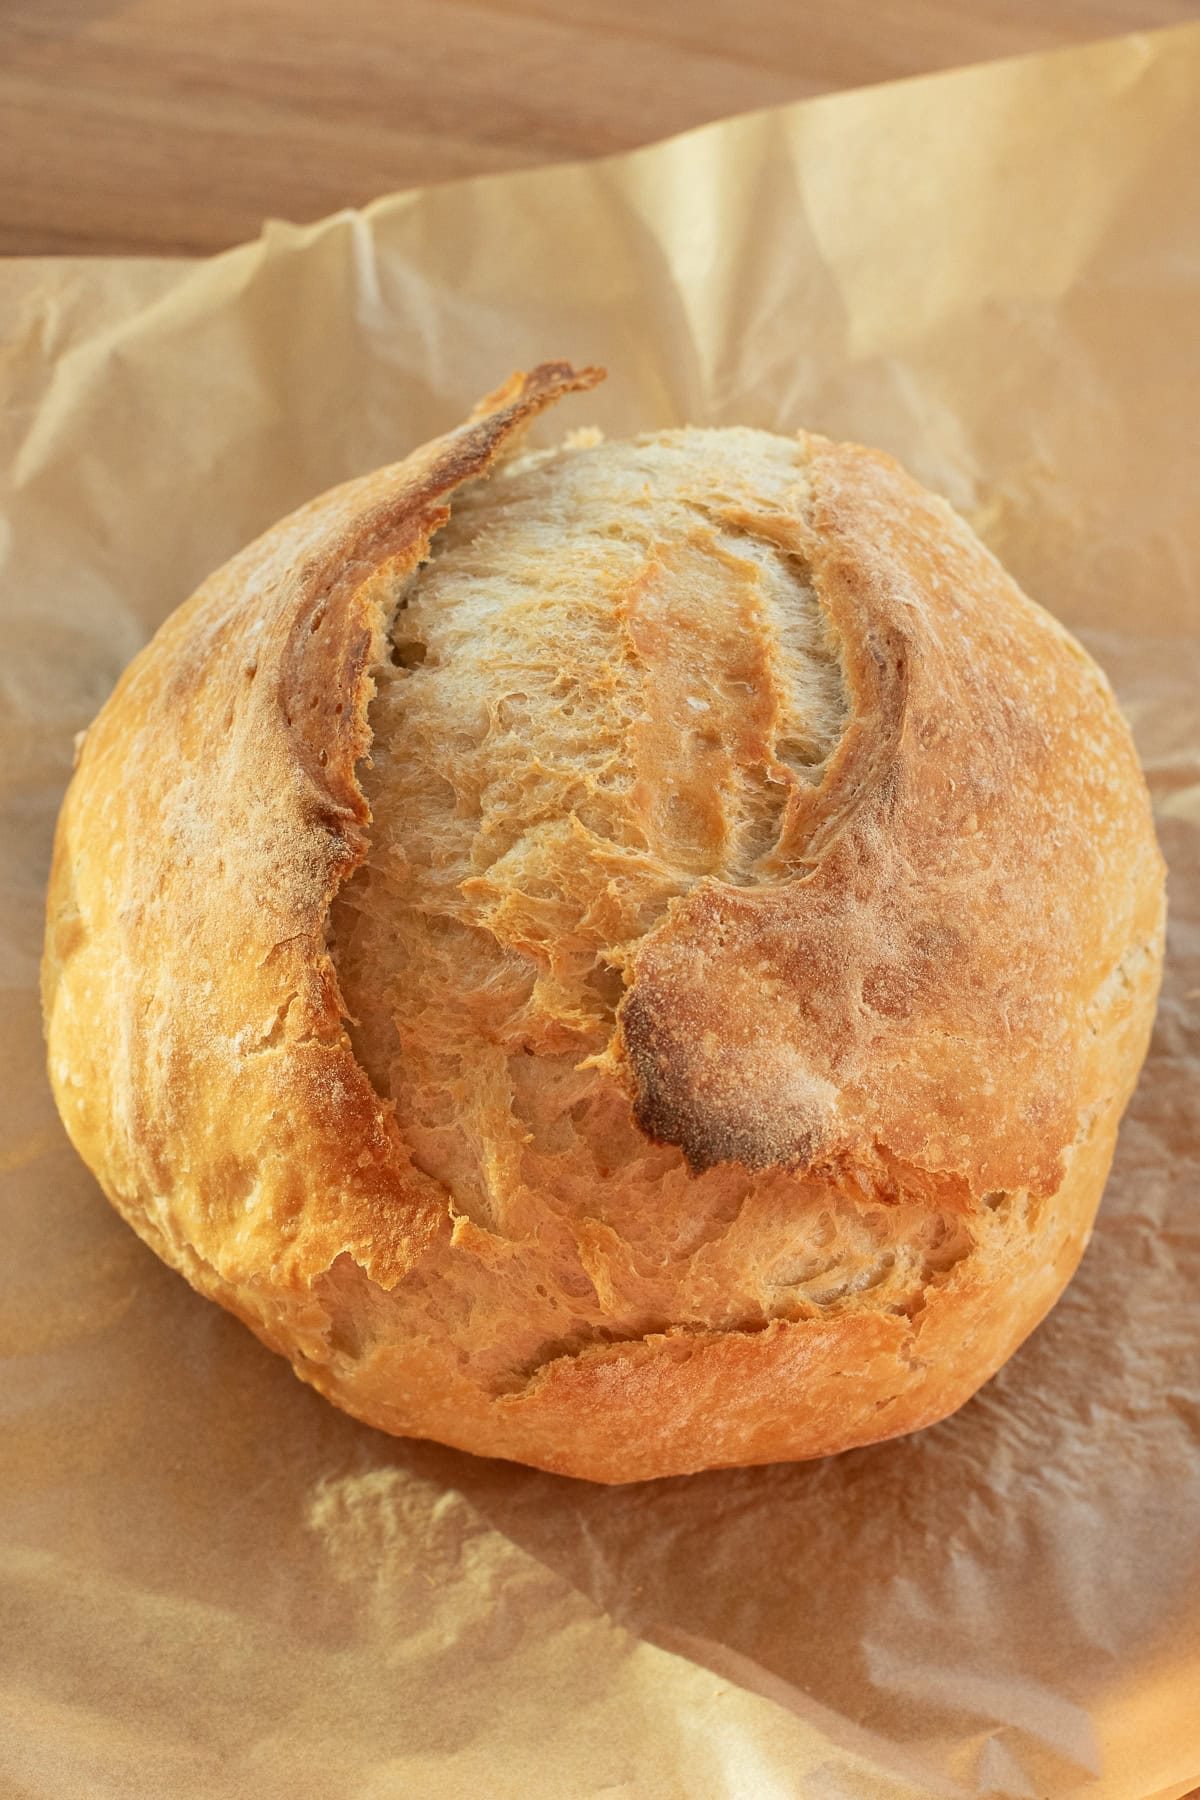
There’s something so special about pulling a golden, crusty loaf of No Knead Bread out of the oven. Plus it looks like you just bought it from the bakery! With just a handful of ingredients and a little patience, this recipe gives you bakery-level bread with a crisp crust and a soft, chewy interior.

If you’ve ever been intimidated by homemade bread, this recipe is your new best friend. There’s no mixer, no kneading, and no fancy techniques, no sourdough starter, just mix, rest, and bake. The result is the kind of bread you’ll want to slice up warm and enjoy with butter or dip into soup.
I love that this bread works for so many occasions. It’s the perfect base for sandwiches, a hearty side with dinner, or a rustic addition to a weekend brunch spread. It’s a beginners bread recipe.
Quick Bites About This Recipe
Flavor: Rustic, slightly nutty, with a classic bakery-style crust.
Skill Level: Easy, perfect for beginner bread bakers.
Swaps: Use all-purpose flour instead of bread flour if that’s what you have.
Make Ahead: Mix the dough, refrigerate overnight, and bake the next day.
Freezer Friendly: Freeze for up to 3 months, wrapped tightly.
Variations & Substitutions: Add shredded cheese, chopped herbs, or seeds for a fun flavor twist.
No Knead Bread Ingredients
Bread flour or all-purpose flour: Gives the bread its chewy structure and golden crust. Bread flour adds extra strength, but all-purpose works just fine too.
Instant yeast: Helps the dough rise quickly and evenly. If you only have active dry yeast, activate it first in warm water with a pinch of sugar until foamy.
Salt: Deepens the flavor and strengthens the dough’s gluten.
Sugar: Feeds the yeast for better rise and adds a subtle hint of sweetness.
Warm water: Activates the yeast and brings everything together into a sticky dough. Aim for 105-110°F.

How to Make No Knead Bread
- In a large mixing bowl, whisk together the flour, yeast, salt, and sugar. Pour in the warm water and mix until a sticky dough forms. You don’t need to knead, just stir until no dry spots remain.
- Cover the bowl with a damp kitchen towel or plastic wrap and let the dough rise in a warm spot for 2-3 hours, or up to 12-24 hours in the refrigerator for more flavor.
- Once the dough has risen and looks bubbly, turn it out onto a floured surface. Gently pull the edges toward the center and shape it into a round loaf. Use your hands to cup and rotate the dough to smooth out the surface. Place the shaped loaf on parchment paper.
- While the dough rests, preheat your oven to 450°F with your Dutch oven inside. Let it heat up for 30 minutes.
- Carefully remove the Dutch oven using oven mitts (it will be very hot!). Lift the parchment with the dough and place it inside. Score the top with a sharp knife or kitchen shears, then cover with the lid.
- Bake covered for 30 minutes, then remove the lid and bake for another 15-20 minutes until the crust is deep golden brown.
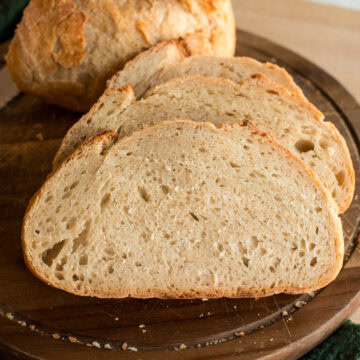
- Transfer the bread to a cooling rack and let it rest at least an hour before slicing. This helps the interior finish cooking and keeps the crumb soft.

Storing and Reheating (If There’s Any Leftovers!)
Counter: Store at room temperature wrapped in a towel or paper bag for up to 2 days.
Freeze: Wrap tightly in plastic wrap, then place in a freezer-safe bag for up to 3 months. Thaw at room temperature.
Reheat: Warm slices in the oven at 350°F for 5-7 minutes or pop in a toaster for that fresh-baked crunch.

Recipe Tips and Notes
- For a fluffier, more open crumb, slightly reduce the flour (try 3 1/4 cups instead of 3 1/2).
- The longer the rise, the more developed the flavor – overnight dough tastes amazing.
- Always use oven mitts when handling the Dutch oven. It’s extremely hot!
- Let the bread cool completely (about an hour) before slicing to avoid a gummy texture. Slicing too soon will not allow the bread to finish baking.
- You can also bake without shaping. Below left loaf is shaped, right loaf is just dropped and baked.

No Knead Bread Recipe
Ingredients
- 3 1/4 – 3 1/2 cups bread flour or all-purpose flour 400-420 g
- 2 1/4 teaspoons instant yeast 7 g (1 packet)
- 2 teaspoons salt 12 g
- 1/2 teaspoon sugar 2 g
- 1 1/2 cups warm water 105-110°F, 360 ml
Instructions
- In a large bowl, whisk together the flour, yeast, salt, and sugar. Add warm water and stir with a wooden spoon until the mixture forms a sticky dough with no dry spots.3 1/4 – 3 1/2 cups bread flour, 2 1/4 teaspoons instant yeast, 2 teaspoons salt, 1/2 teaspoon sugar, 1 1/2 cups warm water
- Cover the bowl with a damp kitchen towel or plastic wrap and let it rise at room temperature for 2-3 hours, or refrigerate for 12-24 hours for extra flavor.
- Preheat the oven to 450°F (232°C) with a Dutch oven inside for 30 minutes.
- Once the dough has doubled and looks bubbly, transfer it to a floured surface. Gently pull the edges to the center and shape into a round loaf by cupping your hands around it and rotating. Place the shaped dough on parchment paper.
- Using oven mitts, carefully remove the Dutch oven. Lift the parchment paper with the dough and lower it inside. Score the top if desired. Cover with the lid and bake for 30 minutes.
- Remove the lid and continue baking for 15-20 minutes until the crust is golden brown.
- Take the bread out using oven mitts and transfer it to a cooling rack. Let it cool for at least an hour before slicing.
Video

Notes
- Substitutions: Use all-purpose flour in place of bread flour. If using active dry yeast, dissolve it in warm water with sugar before mixing.
- Storage: Store in a paper bag or wrapped in a towel at room temperature for up to 2 days.
- Reheat: Toast or warm in a 350°F oven for a few minutes until crusty again.
This recipe is so easy and quick to whip up. I love the crusty bread and appreciate you posting this recipe. Thank you for sharing this recipe
Thank you so much for this kind comment. It genuinely made my day to read it! I’m so glad you loved the result and the ease of making. It means a lot that you took the time to let me know 💛
I can’t wait to try this recipe! But I have one question… If you refrigerate the dough overnight, how is it treated once you take it in it of the fridge? Is this when you’d start the rising time? Crucial tip! Thanks! 🙂
Heather
You can do either, but I like to let it rise at room temperature first whenever possible! 😊
If you refrigerate the dough overnight, that time does count as the rise as well. When you take it out, let it sit at room temp for about 30–60 minutes, then shape and bake. Also, be sure to keep it covered in the refrigerator as well. I hope you love it!! 😀
…once you take it OUT OF THE FRIDGE… sorry about that!
Heather
No worries!! 🙂